
To create a virtual machine with vSphere with Tanzu via the kubectl command, there are steps to follow for the administrator and for the developer, they are very simple but that did not prevent me from wasting a little time on the customization side regarding the OS part.
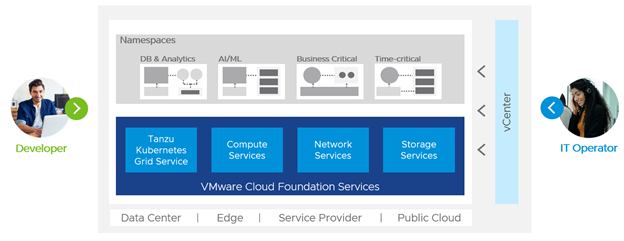
I recommend this article to you to understand the interest of deploying VMs through Kubernetes: Deploy VM in and via Kubernetes. My colleague’s blog: Introducing Virtual Machine Provisioning, via Kubernetes with VM service | VMware is also very well detailed.
In the last part of this article, I will provide some details on the Content Library part and on the YAML part. But first, let’s review the parts to be done on the administrator side and the developer side.
Regarding the administrator
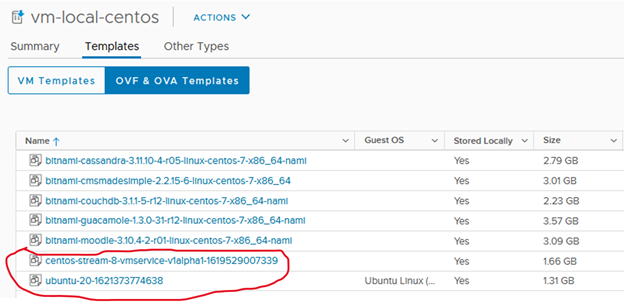
The first step is to download the VMs images that are different from those used for TKC (Tanzu Kubernetes Cluster aka Guest Cluster). The images are available in the VMware marketplace, at the time of writing this article there are 2 (Ubuntu and Centos), the current Ubuntu version does not allow the use of persistent volume (PVC) because it is based on a virtual hardware version 10 and at least version 12 is required, this problem will be soon corrected.
You have to go to the marketplace and do a search with the keyword “vm service”, this allows you to filter (a little) the compatible images => VMware Marketplace.

Then click on the desired image, connect with your MyVMware account.

You have two options, download it then upload it to a local content library

or retrieve the subscription url to create a content library that will synchronize with the one hosted by VMware.

Once the image is loaded or the link is filled in, you should have a content library like this:
Still from the vSphere interface, we must now create a namespace, grant the rights to the users so that they can connect to it, assign the VM class, the content library and the storage class, which should give this
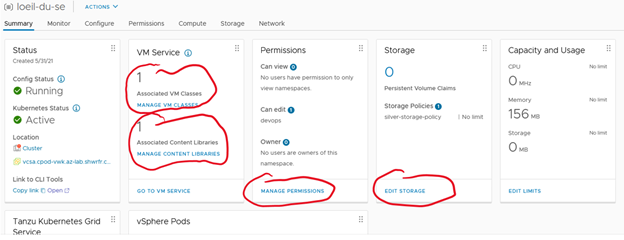
The example above shows once the namespace has been created, how to assign a VM class, a content library, authorize the developers who can consume this namespace, which storage class to use and finally if necessary cap the resources, CPU, memory and storage.
That’s all there is to it on the infrastructure administrator side.
Regarding the developer
You need a YAML description for:
- The configmap which contains the customization of the VM
- The creation of the VM
- The Network service if you want to connect to it from an outside network (optional) PVC if you want to use persistent volumes (optional)
Via the Kubernetes command, the developer connects with his account to the Namespace provided, he will be able to list the classes of services that he can use as well as the images that he can deploy.
kubectl get virtualmachineclass
NAME CPU MEMORY AGE
best-effort-2xlarge 8 64Gi 22d
best-effort-4xlarge 16 128Gi 22d
best-effort-8xlarge 32 128Gi 22d
best-effort-large 4 16Gi 22d
best-effort-medium 2 8Gi 31d
best-effort-small 2 4Gi 31d
best-effort-xlarge 4 32Gi 22d
best-effort-xsmall 2 2Gi 22d
..
guaranteed-xsmall 2 2Gi 22d
kubectl get virtualmachineimage
NAME VERSION OSTYPE FORMAT AGE
centos-stream-8-vmservice-v1alpha1-1619529007339 centos8_64Guest ovf 4h8m
ob-15957779-photon-3-k8s-v1.16.8—vmware.1-tkg.3.60d2ffd v1.16.8+vmware.1-tkg.3.60d2ffd vmwarePhoton64Guest ovf 2d19h
ob-16466772-photon-3-k8s-v1.17.7—vmware.1-tkg.1.154236c v1.17.7+vmware.1-tkg.1.154236c vmwarePhoton64Guest ovf 2d19h
ob-16545581-photon-3-k8s-v1.16.12—vmware.1-tkg.1.da7afe7 v1.16.12+vmware.1-tkg.1.da7afe7 vmwarePhoton64Guest ovf 2d19h
……
ubuntu-20-1621373774638 ubuntu64Guest ovf 4h8m
He can thus create his YAML descriptive files in order to define his resource requirements for his virtual machine (s) and if they wish, he can customize it or them in order to install his tools.
The configmap descriptive file, includes the customization of the VM. The 3 important fields to fill in for personalization are:
- The hostname which contains the OS hostname
- The public-keys, which contains the public key of a computer from which we will connect to the OS in ssh.
- The user-data part is, if you wish, the place where we put the contents of the Cloud Init configuration file, it will have to be encrypted with the base64 command
cat loeil-du-se-vm-configmap.yaml
apiVersion: v1
kind: ConfigMap
metadata:
name: loeil-du-se-vm-configmap # The name of the ConfigMap, must be the same as in the VirtualMachine
namespace: loeil-du-se
data:
# OVF Keys values required by the VM at provision time
hostname: loeil-du-se
public-keys: ssh-rsa AAAAB3NzaC1yc2EAAAADAQABAAABgQDC4Cclh3rN/l70lBNlwQyK6ZtugxqT/7HeerHZKPSO0hcl5ZWLvz2+7QG5FqvYbkPP6EomvyDhE2MPnQ0kWaIrumVxYXAbVdpBBKKdTI3xJpewWB2syxgVOXP2ZOrw4cRLFv18rnESGHfsohedyaSB1qvubPWAqBFa+PSS4xh3zKalUknwc7Bs14fci8tEwEg8cpvNsqvrPZliJ6qTYFGqKuG6Ct+y449JNW6k6itTepgSYvUdJfjBTxk5tDzBdWz28km5N7lxgUB0rIWgSDl1XLCBrmm+H6bkHtD59MxAuxwLjih4tS4PzspcVjwWiJhd0HH7u2wbsPLCrrAX7am4EP40zphu9IR+fVxk+2jp7eD2uXPS6p9sDPEWHl6wGclI7pnfuoyvcn+CIwCtMweLuUw5MPj2eIIXcBhqUffeVAXVHrx8+e7+yHvqfyhqm2J9Ay3yt3zvAcXW0VqDxfvnfmv8sc9VNUW+8fUeyoo4b4uZRLLSf2DHM8= root@fbenrejdal-z01 # the public key to be able to do ssh without password from my laptop
user-data: | # optional, enter the base64 cloud init encodded file, the result key could be a one line key or a multiple lines key. watch out the indentation, the line should be start under the “r” of user-data
I2Nsb3VkLWNvbmZpZwojIFdBVENIT1VUIHRoZSBmaXJzdCBsaW5lIG11c3Qgc3RhcnQgd2l0aCAj
Y2xvdWQtY29uZmlnCmdyb3VwczoKICAtIGRldm9wcwp1c2VyczoKICAtIGRlZmF1bHQgIyBDcmVh
dGUgdGhlIGRlZmF1bHQgdXNlciBmb3IgdGhlIE9TCiAgLSBuYW1lOiBmYmUKICAgIHNzaC1hdXRo
b3JpemVkLWtleXM6ICMgdGhlIHB1YmxpYyBrZXkgb2YgbXkgbGFwdG9wLCBpdCBjb3VsZCBhbHNv
IGJlIGZpbGxlZCBpbiB0aGUgT1ZGIHByb3BlcnR5CiAgICAgIC0gc3NoLXJzYSBBQUFBQjNOemFD
MXljMkVBQUFBREFRQUJBQUFCZ1FEQzRDY2xoM3JOL2w3MGxCTmx3UXlLNlp0dWd4cVRHLzdIZWVy
SFpLUFNPMGhjbDVaV0x2ejIrN1FHNUZxdllia1BQNkVvbXZ5RGhFMk1QblEwa1dhSXJ1bVZ4WVhB
YlZkcEJCS0tkVEkzeEpwZXdXL0Iyc3l4Z1ZPWFAyWk9ydzRjUkxGdjE4cm5FU0dIZisvc29oZWR5
YVNCMXF2dWJQV0FxQkZhK1BTUzR4aDZELzN6S2FsVWtud2M3QnMxNGZjaTh0RXdFZzhjcHZOc3F2
clBabGlKNnFUWUZHcUt1RzZDdCt5NDQ5Sk5XNms2aXRUZXBnU1l2VWRKZmpCVHhrNXREekJkV3oy
OGttNU43bHhnVUIwcklXZ1NEbDFYTENCcm1tK0g2YmtIdEQ1OU14QXV4d0xqaWg0dFM0UHpzcGNW
dGFydCBtb25nb2QK
The base64 is obtained as follows:
base64 loeil-du-se-vm-cloud-init.yaml
Its content in clear:
cat loeil-du-se-vm-cloud-init.yaml
#cloud-config
# WATCHOUT the first line must start with #cloud-config
groups:
– devops
users:
– default # Create the default user for the OS
– name: fbe
ssh-authorized-keys: # the public key of my laptop, it could also be filled in the OVF property
– ssh-rsa AAAAB3NzaC1yc2EAAAADAQABAAABgQDC4Cclh3rN/l70lBNlwQyK6ZtugxqTG7HeerHZKPSO0hcl5ZWLvz2+7QG5FqvYbkPP6EomvyDhE2MPnQ0kWaIrumVxYXAbVdpBBKKdTI3xJpewWB2syxgVOXP2ZOrw4cRLFv18rnESGHf+sohedyaSB1qvubPWAqBFa+PSS4xh6D3zKalUknwc7Bs14fci8tEwEg8cpvNsqvrPZliJ6qTYFGqKuG6Ct+y449JNW6k6itTepgSYvUdJfjBTxk5tDzBdWz28km5N7lxgUB0rIWgSDl1XLCBrmm+H6bkHtD59MxAuxwLjih4tS4PzspcVjwWiJhd0HH7u2wbsPLCrrAX7am4EP40zphu9IR+fVxk+2jp7eD2uXPS6p9sDPEWHl6wGclI7pnfuoyvcn+CIwCtMweLuUw5MPj2eIIXcBhqUffeVAXVHrx8+e7+yHvqfyhqm2J9Ay3yt3zvAcXW0VqDxfvnfmv8sc9VNUW+8fUeyoo4b4uZRLLSf2DHM8= root@fbenrejdal-z01
groups: sudo, devops
shell: /bin/bash
passwd: VMware1!
sudo: [‘ALL=(ALL) NOPASSWD:ALL’] # the user fbe will not need to enter password when using sudo
ssh_pwauth: true
chpasswd:
list: |
fbe:VMware1! # in case you want to change password of users
expire: false # if you don’t want your password to expire
runcmd: # Example of runcmd to install MongoDB. Cloud Init has also APT keyword to do installation
– echo “deb [ arch=amd64,arm64 ] https://repo.mongodb.org/apt/ubuntu focal/mongodb-org/4.4 multiverse” | tee /etc/apt/sources.list.d/mongodb-org-4.4.list
– wget -qO – https://www.mongodb.org/static/pgp/server-4.4.asc | apt-key add –
– echo “deb [ arch=amd64,arm64 ] https://repo.mongodb.org/apt/ubuntu focal/mongodb-org/4.4 multiverse” | tee /etc/apt/sources.list.d/mongodb-org-4.4.list
– apt-get update
– apt-get install -y mongodb-org
– echo “mongodb-org hold” | dpkg –set-selections
– echo “mongodb-org-server hold” | dpkg –set-selections
– echo “mongodb-org-shell hold” | dpkg –set-selections
– echo “mongodb-org-mongos hold” | dpkg –set-selections
– echo “mongodb-org-tools hold” | dpkg –set-selections
– sed -i ‘s/127.0.0.1/0.0.0.0/’ /etc/mongod.conf
– ufw allow from any to any port 27017 proto tcp
– sleep 2
– systemctl start mongod
Very very important, the file must absolutely start with # cloud-config and nothing else. It’s still a classic Cloud Init file. If you’re not too familiar with Cloud Init, I’ve put some comments there to make it a bit more readable.
The VM description file
cat loeil-du-se-vm-deployment.yaml
apiVersion: vmoperator.vmware.com/v1alpha1
kind: VirtualMachine
metadata:
name: loeil-du-se-vm
namespace: loeil-du-se
labels:
vm: loeil-du-se-vm
spec:
imageName: ubuntu-20-1621373774638 #the image must exist on the content library and must be listed with the command kubectl get virtualmachineimage
className: best-effort-xsmall
powerState: poweredOn
storageClass: silver-storage-policy
networkInterfaces:
– networkType: nsx-t #must be nsx-t or vsphere-distributed depending on your install.
# networkName: if vsphere-distributed you must specify the name of the network portgroup
vmMetadata:
configMapName: loeil-du-se-vm-configmap # The K8s configmap where personalization is stored
transport: OvfEnv
#
# when writing this article, the available image ubuntu (ubuntu-20-1621373774638) is not able to use volume because is using virtual hardware version 10
# Instead you can use the centos image (centos-stream-8-vmservice-v1alpha1-1619529007339)
# volumes: #when writing this article, the volume mount parameter is not use, the volume is seen in the guest but should be formated and mounted manualy
# – name: loeil-du-se-volume
# persistentVolumeClaim:
# claimName: loeil-du-se-pvc
# readOnly: false
Optional, the description file of the network service In my example, I created a service of type LoadBalancer to connect in ssh from an external network to that of the PODs.
Please note, the kind is not Service as usual but VirtualMachineService
cat loeil-du-se-vm-service.yaml
apiVersion: vmoperator.vmware.com/v1alpha1
kind: VirtualMachineService
metadata:
name: loeil-du-se-vm
spec:
selector:
vm: loeil-du-se-vm
type: LoadBalancer
ports:
– name: ssh
port: 22
protocol: TCP
targetPort: 22
Once the YAML files are created, all that remains is to have them taken into account by Kubernetes.
Kubectl create -f loeil-du-se-vm-configmap.yaml
Kubectl create -f loeil-du-se-vm-deployment.yaml
Kubectl create -f loeil-du-se-vm-service.yaml
To verify the creation of the VM:
Kubectl get vm
To know more about it:
Kubectl describe vm loeil-du-se-vm
It remains a classic VM, so it will benefit from HA and vMotion (via DRS or host maintenance mode). On the other hand, it is “Developer Managed”, that is to say that it cannot be managed via vCenter, you will not see the contents of the console for example.
![]()
One tip though, check which ESXi the VM is running on, then connect directly to the ESXi through a browser and there you will have access to the console.
To connect in ssh, if you have access via a loadbalancer like me, you can connect to it directly, otherwise you will have to go through a bounce POD (like busybox, alpine or other) and do an ssh with the IP address on the POD network. You can find it as follows:
kubectl get vm loeil-du-se-vm -o jsonpath='{.status.vmIp}’; echo
10.244.0.130
The ssh must be done via the user entered in the Cloud Init, I had set fbe, it looks like this:
kubectl get svc loeil-du-se-vm
NAME TYPE CLUSTER-IP EXTERNAL-IP PORT(S) AGE
loeil-du-se-vm LoadBalancer 10.96.1.108 172.20.18.71 22:32148/TCP 2d22h
ssh fbe@172.20.18.71
…
To run a command as administrator (user “root”), use “sudo <command>”.
See “man sudo_root” for details.
fbe@loeil-du-se:~$
If the ssh does not work, it is because the user was not taken into account by Cloud Init, try with root to obtain the default user, generally ubuntu for Ubuntu and cloud-user for CentOS:
ssh roo@172.20.18.71
Please login as the user “ubuntu” rather than the user “root”.
If you have the error below, it is because the laptop from which you are connecting does not have the public ssh key entered or there is an error in it, so you must check the key appearing in the configmap file:
fbe@172.20.18.71: Permission denied (publickey,password).
To debug Cloud Init, you must connect to the vm os via ssh or via the console and look at the log /var/log/cloud-init-output.log
There you go, feel free to ping me if you need more information.
Leave a Reply