In order to simplify the authentication of Kubernetes clusters operating on different clouds, VMware has developed the Pinniped project accessible in Opensource. Pinniped has been integrated by default into the VMware Tanzu Kubernetes Grid (TKG) offering since version 1.3, replacing the Gangway. inniped allows authentication from OIDC or LDAP sources. In the case of LDAP source, Pinniped does not connect directly to LDAP but currently relies on the Dex component as Gangway already did.
When a user runs a Kubernetes command for the first time or after a certain period of inactivity, they are prompted to authenticate only once with their corporate credentials and can then consume multiple Kubernetes clusters.
I wanted to test this functionality in my lab with an LDAPS / Active Directory server running Windows 2019 and I quickly encountered the eternal problem of certificates not signed by a known authority. So I had to create a certificate that is recognized by the Active Directory server. Searching for hours on the internet, I ended up finding an article by Peter Mescalchin that worked on the first try: Enable LDAP over SSL (LDAPS) for Microsoft Active Directory servers. – bl.ocks.org.
However, when I wanted to use this procedure with Pinniped, it did not work because the SAN (Subject Alternative Name) information was not present in the certificate. By crossing several articles on the subject, I was able to adapt Peter Mescalchin’s solution so that the certificates integrate the SAN information. It gives this:
Creation of the Root certificate
Via OpenSSL (I used a Linux Ubuntu) create a private key (ca.key in my example) to be able to then create the root certificate (ca.crt in my example). The first command will ask you for a password and the second for your organization information.
$ openssl genrsa -aes256 -out ca.key 4096
$ openssl req -new -x509 -days 3650 -key ca.key -out ca.crt
Import the Root certificate on the AD server
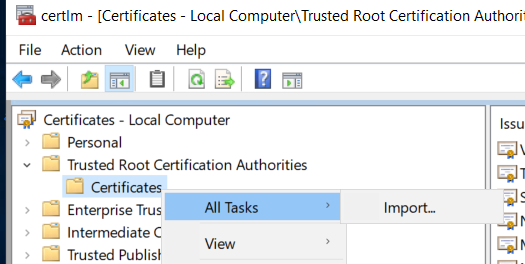
From the AD server, type the command certlm or via Control Pannel, type computer certificates in the search bar:
Be careful to choose “Manage computer certificates” and not “Manage user certificates”

Import the previously generated ca.crt in the “Trusted Root Certification Authorities \ Certificates” section

Creation of the Client certificate
Still from the Active Directory server, create a file, in our example it has the name request.inf. In red, I have made changes from the original procedure to add the SAN information. Be careful to put the FQDN of the AD server in CN. The values of _continue_ = “dns” and _continue_ = “ip-address” correspond to the SAN values, the other possible values to reference the AD server.
[Version]
Signature=”$Windows NT$”
[NewRequest]
Subject = “CN=ad-server.cpod-velocity.az-fkd.cloud-garage.net“
KeySpec = 1
KeyLength = 2048
Exportable = TRUE
MachineKeySet = TRUE
SMIME = FALSE
PrivateKeyArchive = FALSE
UserProtected = FALSE
UseExistingKeySet = FALSE
ProviderName = “Microsoft RSA SChannel Cryptographic Provider”
ProviderType = 12
RequestType = PKCS10
KeyUsage = 0xa0
[EnhancedKeyUsageExtension]
OID = 1.3.6.1.5.5.7.3.1 ; Server Authentication
[Extensions]
; SANs can be included in the Extensions section by using the following text format. Note 2.5.29.17 is the OID for a SAN extension.
2.5.29.17 = “{text}”
_continue_ = “dns=ad-server&”
_continue_ = “dns=ad-server.cpod-velocity.az-fkd.cloud-garage.net&”
_continue_ = “dns=cloud-garage.net&”
_continue_ = “ipaddress=172.17.13.9&”
Generate the client.csr file with the command below:
c:\> certreq -new request.inf client.csr
From the Linux machine:
Create an extension file, in our example it has the name v3ext.txt. In red, I have made the changes from the initial procedure to add the SAN information under the heading v3_ca which will be referenced in the next order.
keyUsage=digitalSignature,keyEncipherment
extendedKeyUsage=serverAuth
subjectKeyIdentifier=hash
# These extensions are added when ‘ca’ signs a request.
[ v3_ca ]
subjectAltName = @alt_names
[ alt_names ]
DNS.1 = ad-server.cpod-velocity.az-fkd.cloud-garage.net
DNS.2 = ad-server
IP.1 = 172.17.13.9
Still from the Linux machine, create the client.crt certificate from the files generated in the previous steps ca.crt, ca.key, client.csr and v3ext.txt, in red which has been added compared to the command outcome of the initial procedure
$ openssl x509 -req -days 3650 -in client.csr -CA ca.crt -CAkey ca.key -extfile v3ext.txt -set_serial 01 -out client.crt -extensions v3_ca
To verify the presence of SAN information
$ openssl x509 -in client.crt -text
…..
X509v3 extensions:
X509v3 Subject Alternative Name:
DNS:ad-server.cpod-velocity.az-fkd.cloud-garage.net, DNS:ad-server, IP Address:172.17.13.9
Import the Client certificate
From the AD server
C:\> certreq -accept client.crt
The certificate should appear in “Personal \ Certificates”

For the certificate to be taken into account, you must either restart the AD server or force LDAPS to load the certificate with the procedure below:
Still from the AD server, create a text file, in our example it is called ldap-renewservercert.txt with the content below (note the end of the file includes a line with a – (a dash):
dn:
changetype: modify
add: renewServerCertificate
renewServerCertificate: 1
–
Then type the command below:
c:\> ldifde -i -f ldap-renewservercert.txt
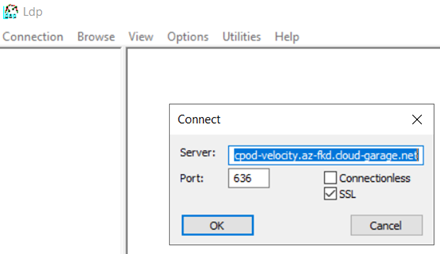
To test the taking into account, use the ldp.exe utility by selecting port 636 (or another if specific) and checking the SSL box.

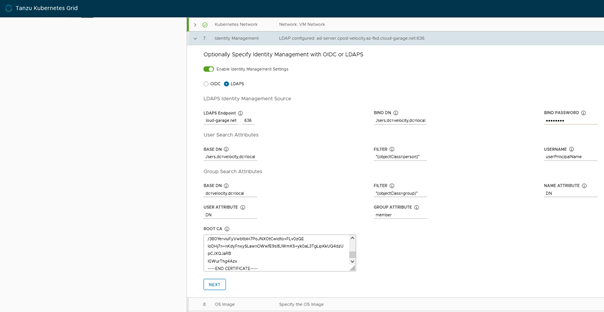
Once all the procedure is done, you have to recover the ca.crt generated in the first step to give it to Pinniped. This can be done either when the TKG management cluster is created or subsequently.
If the management cluster has not yet been created:
$ tanzu management-cluster create –ui
(there are two dashes before the ui argument but WordPress only displays one)
In my test I chose vSphere as the platform, at the identity manager step it will be necessary to copy the certificate in the ROOT CA part

If the TKG management cluster has already been created and you want to update it:
From the Kubernetes context of the manager cluster, encrypt the Root certificate of the AD server with the base64 command and get the result:
$ base64 -w 0 ca.crt
Modify the certificate in the dex configmap by the result of the previous command:
$ kubectl edit configmap -n tanzu-system-auth dex
# Please edit the object below. Lines beginning with a ‘#’ will be ignored,
# and an empty file will abort the edit. If an error occurs while saving this file will be
# reopened with the relevant failures.
#
apiVersion: v1
data:
config.yaml: |
issuer: https://172.17.13.10:30167
frontend:
theme: tkg
web:
https: 0.0.0.0:5556
tlsCert: /etc/dex/tls/tls.crt
tlsKey: /etc/dex/tls/tls.key
expiry:
signingKeys: 90m
idTokens: 5m
logger:
level: info
format: json
staticClients:
– id: pinniped-client-id
name: pinniped-client-id
redirectURIs:
– https://172.17.13.10:31234/callback
secret: 089db7e23b19cb628ba841b17cc32ea4
connectors:
– type: ldap
id: ldap
name: LDAP
config:
host: ad-server.cpod-velocity.az-fkd.cloud-garage.net:636
insecureSkipVerify: false
bindDN: cn=administrator,cn=Users,dc=velocity,dc=local
bindPW: $BIND_PW_ENV_VAR
usernamePrompt: LDAP Username
rootCAData:
LS0tLS1CRUdJTiBDRVJUSUZJQ0FURS0tLS0tCk1JSUdQekNDQkNlZ0F3SUJBZ0lVU2tQd0JPazVYRVFLRlpydXdwZXBoeTlINndzd0RRWUpLb1pJaHZjTkFRRUwKQlFBd2dhNHhDek
KQmdOVkJBWVRBa1pTTVF3d0NnWURWUVFJREFOSlJFWXhEakFNQmdOVkJBY01CVkJoY21segpNUlF3RWdZRFZRUUtEQXRNYjJWcGJDMWtkUzFUUlRFTE1Ba0dBMVVFQ3d3Q1UwVXhPRE
EyQmdOVkJBTU1MMkZrCkxYTmxjblpsY2k1amNHOWtMWFpsYkc5amFYUjVMbUY2TFdaclpDNWpiRzkxWkMxbllYSmhaMlV1Ym1WME1TUXcKSWdZSktvWklodmNOQVFrQkZoVm1ZbVZ1Y
21WcVpHRnNRSFp0ZDJGeVpTNWpiMjB3SGhjTk1qRXdOekEzTURjeQpNekl5V2hjTk16RXdOekExTURjeU16SXlXakNCcmpFTE1Ba0dBMVVFQmhNQ1JsSXhEREFLQmdOVkJBZ01BMGxFClJqRU9NQXdHQTFVRUJ3d0ZVR0Z5YVhNeEZEQVNCZ05WQkFvTUMweHZaV2xzTFdSMUxWTkZNUXN3Q1FZRFZRUUwKREFKVFJURTRNRFlHQTFVRUF3d3ZZV1F0YzJWeWRtVnlMbU53YjJ
RdGRtVnNiMk5wZEhrdVlYb3RabXRrTG1OcwpiM1ZrTFdkaGNtRm5aUzV1WlhReEpEQWlCZ2txaGtpRzl3MEJDUUVXRldaaVpXNXlaV3BrWVd4QWRtMTNZWEpsCkxtTnZiVENDQWlJd0RRWUpLb1pJaHZjTkFRRUJCUUFEZ2dJUEFEQ0NBZ29DZ2dJQkFMaWx0WE81WkxNOFRzZ0YKMXFxRFFURi9xV1EzTGkvalU2ZFJqM1VMLys2YitRL0VUVjdIb2VLMi9hK09UdHlRbzY4c
k9ySTVJRjNNWlJqKwpzU0JuWC9SejczczYvVjArWXhJTFozSmNNenlWUzZtR1ZhNTZBTmFZRFRqSkErUzF5enZJczFpZXdMWDR2YlFzCnJRdFE2NVphb3NYbFlMSWpxdzZCY01TZUlX
NUlUWitlUVF3emlkN2t5ZFBYNDdTBSSm1vR…..1
….
Relaunch the dex pod in the tanzu-system-auth namespace to take the change into account.
Once the management cluster has the right certificate
From there, create a workload cluster:
$ tanzu cluster create my-cluster -f <fichier-environnement>
Import the administration Kubeconfig of the created workload cluster:
$ tanzu cluster kubeconfig get my-cluster –admin
(there are two dashes before the admin argument but WordPress only displays one)
Connect to the workload cluster with the admin context, as admin no need for an account:
$ kubectl use-context my-cluster-admin@my-cluster
Create a cluster role binding with the role that interests you (here cluster-admin) for the desired users, this will allow the user to use this cluster once authenticated:
$ kubectl create clusterrolebinding admin-fbenrejdal –clusterrole cluster-admin –user fbe@velocity.local
(there are two dashes before the clusterrole and user arguments but WordPress only displays one)
Export the workload cluster kubeconfig, this is the kubeconfig that will need to be passed to users, it has no admin context and will require user authentication. The user will consume this cluster according to the rights defined in clusterrolebinding from the previous step:
$ tanzu cluster kubeconfig get my-cluster –export-file my-cluster-kubeconfig
(there are two dashes before the export argument but WordPress only displays one)
Issue a kubernetes command with the generated kubeconfig file, which will launch the browser for authentication:
$ kubectl get pods -A –kubeconfig my-cluster-kubeconfig
(there are two dashes before the kubeconfig argument but WordPress only displays one)
You should be redirected to a browser with a web page asking for your username and password:

Once entered, you will get the result of your last command:

The result of the previously command should be displayed:
NAMESPACE NAME READY STATUS RESTARTS AGE
kube-system antrea-agent-q9xpg 2/2 Running 0 7d15h
kube-system antrea-agent-qlmj8 2/2 Running 0 7d15h
kube-system antrea-controller-6bb57bd84-6cj58 1/1 Running 0 7d15h
kube-system coredns-68d49685bd-bjcps 1/1 Running 0 7d15h
kube-system coredns-68d49685bd-vttdw 1/1 Running 0 7d15h
kube-system etcd-my-cluster-control-plane-48n9f 1/1 Running 0 7d15h
kube-system kube-apiserver-my-cluster-control-plane-48n9f 1/1 Running 0 7d15h
kube-system kube-controller-manager-my-cluster-control-plane-48n9f 1/1 Running 0 7d15h
kube-system kube-proxy-dntrc 1/1 Running 0 7d15h
kube-system kube-proxy-k5m9g 1/1 Running 0 7d15h
kube-system kube-scheduler-my-cluster-control-plane-48n9f 1/1 Running 0 7d15h
kube-system kube-vip-my-cluster-control-plane-48n9f 1/1 Running 0 7d15h
kube-system metrics-server-66cb4fb659-xlprc 1/1 Running 0 7d15h
kube-system vsphere-cloud-controller-manager-vmfwl 1/1 Running 1 7d15h
kube-system vsphere-csi-controller-bd8b6cc8c-8ljl8 6/6 Running 0 7d15h
kube-system vsphere-csi-node-6xqf5 3/3 Running 0 7d15h
kube-system vsphere-csi-node-vmbmq 3/3 Running 0 7d15h
pinniped-concierge pinniped-concierge-dcd587f97-lk9n5 1/1 Running 0 7d15h
pinniped-concierge pinniped-concierge-dcd587f97-zrnb7 1/1 Running 0 7d15h
pinniped-concierge pinniped-concierge-kube-cert-agent-8a8e3e38 1/1 Running 0 7d15h
pinniped-supervisor pinniped-post-deploy-job-4ldt7 0/1 Completed 0 7d15h
pinniped-supervisor pinniped-post-deploy-job-m74gz 0/1 Error 0 7d15h
tkg-system kapp-controller-69c4d4bbb4-kwk5l 1/1 Running 0 7d15h
Leave a Reply